Chocolate Cherry Muffins

choc cherry muffins 3

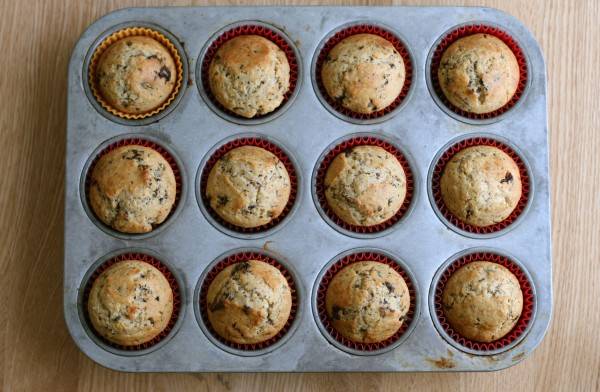
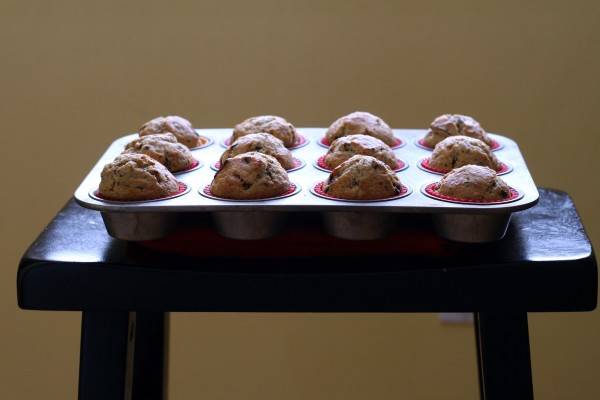
One dozen chocolate cherry muffins for New Year’s Day.

It’s the first day of the new year. I should be posting something wholesome and healthy, but one of my boys asked me to make scones for breakfast. Our butter supply has been completely depleted by Christmas cookie baking, so we opted for muffins instead. The fact that muffins are simpler to make than scones helped alleviate my sadness that there isn’t a knob of butter to be found in the house.

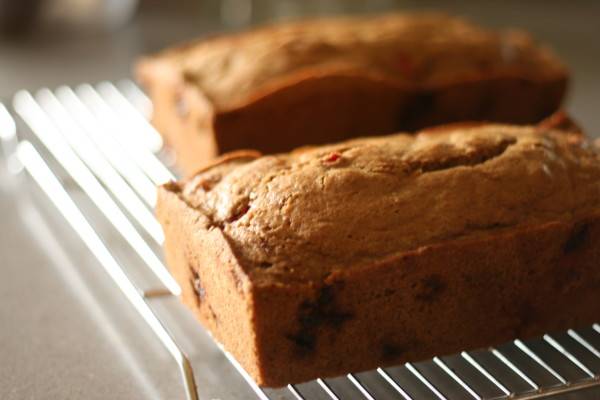
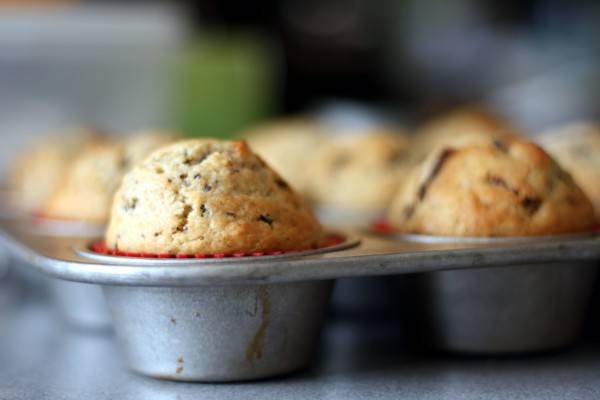
I began with King Arthur Flour’s basic muffin recipe and added sweet dried cherries and dark chocolate. I also adopted their muffin-baking technique, which was touted as creating beautiful muffin domes. And it delivered–check out those mini-muffin moutains! I’ve never had a muffin recipe puff up so dramatically.

Muffins with sweet dried cherries and freckles of dark chocolate

Muffins with sweet dried cherries and freckles of dark chocolate

KA recommends preheating your oven to 500 degrees, then dropping it to 400 degrees when the muffins are put into bake. It is this temperature switch that causes the muffins to rise so effortlessly. I’m never cooking muffins any other way again. It sounded like too hot an oven, but they were cooked through and lightly golden at the 25 minute mark.

I chopped up Callebaut semi-sweet chocolate and dried cherries, irregularly but on the fine side, so that bits of chewy fruit and melt-y chocolate would be found throughout the muffin.

All in all, it was a warm and cozy way to start this chilly new year.

choc cherry muffins 1Chocolate Cherry Muffins
Makes one dozen

2 cups all-purpose, unbleached flour
1/2 cup sugar
1 tablespoon baking powder
1/2 teaspoon fine salt
1 cup milk
1/4 cup vegetable oil
2 large eggs
1 teaspoon pure vanilla extract
2 1/2 ounces dark chocolate, chopped
1/2 cup dried cherries, chopped

Preheat oven to 500 degrees. In a large bowl, whisk together flour, sugar, baking powder and salt.

In a medium bowl, whisk together milk, oil, eggs and vanilla.

Add wet ingredients to dry, and stir until barely combined (the batter will still be lumpy.)

Gently fold in chopped chocolate and cherries.

Line a standard size muffin pan and fill each cup up with batter almost to the top.

Put muffins in oven and drop temperature to 400 degrees.

Bake for 20-25 minutes until muffins are lightly golden-brown. Let cool for a few minutes, then remove muffins from pan to a cooling rack.


Share

10 Tips for Baking Holiday Cookies

chocthumbprints4

Chocolate Peppermint Thumbprints

http://tallgrasskitchen.com/chocolate-peppermint-thumbprints

We are well into the holiday baking season over here. Any time between Thanksgiving and January 1 I don’t need any excuses to grab some butter and dust the kitchen floor with flour.

The smell of spicy gingerbread, the silky softness of melted chocolate, the pleasant bite of peppermint–it’s all wonderful and the season gives us an excuse to go a little over the top. Luckily, the season also provides a way to unload all of the extra calories on neighbors and friends in the name of Noel.

IMG_5125

Naughty Bars: even if they’ve been nice.

http://tallgrasskitchen.com/naughty-bars

Here are 10 tips for those embarking on a baking extravaganza for the holidays:

  1. Let’s talk butter: It’s delicious, use it. So many recipes begin with “softened” butter. But if your butter is too soft, it won’t cream properly and there’s a chance your cookies might melt into a puddle as they bake. I take butter from the fridge right when I’m starting to make the cookie. I slice it thinly and put it in the bowl, then I spend a few minutes gathering my ingredients and putting my dry ingredients together. By the time I’m ready to cream my butter and sugar, it’s soft enough.
  2. Cream it: unfortunately for those who don’t have a stand mixer, this step is a little trickier. When a recipe asks you to cream butter and sugar together, really go to town. Like for 5+ minutes. The results should be very light and fluffy, almost like frosting.
  3. Chill out: drop cookies with eggs benefit from an overnight stay in the fridge. It allows the liquid eggs to fully hydrate the dry ingredients. I don’t know the science behind why, but this results in a prettier, more complex-flavored cookie. If I bake my chocolate chip cookies right away, they are pale and taste just fine. If I wait 24-72 hours, they bake up golden with hints of toffee and caramel.
  4. Cookies are finished baking before you think they are–if you can smell them, they were probably done two minutes ago. The tops should appear barely cooked (but not shiny and raw), and the bottoms and edges should be just turning golden-brown.
  5. Ditch the dough in a tube–it really only takes a few more minutes to mix up your own. Your neighbors will thank you.
    almond saltine toffee 2

    Almond saltine toffee:

    http://tallgrasskitchen.com/chocolate-almond-saltine-toffee

  6. If you’re putting together a cookie platter, add some color. It can be in a traditional manner, with a brightly-iced sugar cookie. Or a cookie studded with fresh cranberries or something made with jam can add a pretty ribbon of scarlet (like these jam straws.)
  7. Add texture and shape to your platter with chunky bar cookies, a nut-studded dessert or dense and delicious shortbread fingers.
  8. Add something that’s not a cookie to your platter: plump truffles (see link below), shards of toffee, squares of fudge or even a cup of rosemary-scented mixed nuts break up the visual field and add a taste contrast.
  9. Wrap it up: it doesn’t have to be fancy, but a little presentation goes a long way. I love to use these brown paper loaf pans or cake pans, then wrap everything in a bundle of cellophane and tie off with red and white baker’s twine. A pretty paper plate and cellophane works too.
  10. Label it: people aren’t as adventurous as you or me. Sometimes if they don’t know what’s in something, they won’t even try it! Can you believe it? Include a label that lists the cookies included in the package and maybe even a few primary ingredients/flavors. If there are any hidden nuts, it’s a good idea to mention them in case someone has allergies.
  11. Bonus tip: if you don’t already have a stand mixer, and you’ve been a very good little girl or boy this year, ask for one! Nothing can cream butter and sugar like a stand mixer.
    chocolate coconut honey truffles

    Chocolate Coconut Honey Truffles

    lemon cream cookie3

    Gooey Lemon Cream Cookies

    http://tallgrasskitchen.com/lemon-cream-cookies

butterscotch cookies 1

Butterscotch Cookies with Browned Butter Frosting

http://tallgrasskitchen.com/butterscotch-cookies-with-browned-butter-frosting-treat-number-six

Lastly, I recently had the pleasure of helping judge this year’s Milwaukee Journal Sentinel’s holiday cookie contest. To see all of this year’s winners and runners-up, see here.

To purchase an e-book of all the past contest winners, plus some bonus recipes, click here.

Share

Mint Chip Ice Cream

mint chip ice cream

This may be my favorite week of the year.

According to the calendar, summer ended several weeks ago. But this early October week was glorious and golden.

Mornings are chilly enough to layer on a zippered sweatshirt and enjoy a warm drink, but by mid-afternoon the sweatshirts have been abandoned in a pile on the ground. The kids are tearing around the yard, yelling, building, tagging and I’m coaxing a few more sun-ripened tomatoes from my vines.

It was an afternoon for ice cream, and probably the last cones we will enjoy outdoors. My eldest’s favorite flavor is mint chocolate chip, and I planted a wild, trailing mint plant for just this purpose. At the ripe age of five he has been out in the world long enough to be convinced that mint chocolate chip ice cream should be GREEN. I heartily disagreed, but he held fast.

I dug out the food coloring from the dusty depths of the cupboard and reluctantly added a single drop to the churning batter. A single drip was all it took to achieve the traditional pale green. A large bunch of backyard-grown mint was all it took to imbue the cream with a strong and spirited flavor.

And in the end, I think I am convinced. Green mint chocolate chip ice cream just might taste a little mintier than its paler, un-tinted cousin.

Backyard Mint Ice Cream
by Jeni Britton Bauer, from Jeni’s Splended Ice Creams at Home

2 cups whole milk, 2 tablespoons reserved
1 tablespoon plus 1 teaspoon cornstarch
3 tablespoons cream cheese, softened (3 ounces)
1/8 teaspoon fine sea salt
1 1/4 cups heavy cream
2/3 cup sugar
2 tablespoons light corn syrup
a large handful of fresh mint, torn into pieces
4 ounces good dark chocolate, chopped (and melted when ready to make ice cream)

Whisk two tablespoons of milk and cornstarch together in a small bowl, set aside.

Place cream cheese and salt in a large bowl, set aside.

Heat remaining milk, cream, sugar and corn syrup in a large stockpot. Bring to a rolling boil and then let it go for four minutes. Turn off the heat and whisk in the cornstarch slurry. Return to heat and a boil, and boil for one minute until thickened.

Little by little, pour the hot cream into the bowl containing the cream cheese. Whisk vigorously until very smooth.

Add in the mint, cover and chill for several hours or overnight.

When ready to make, strain out the mint and churn ice cream according to ice cream machine’s directions. When ice cream is almost finished, melt chocolate until it is smooth. Drizzle in top of ice cream maker, letting chocolate harden and break up into little chips or ‘freckles’.

Store in an airtight container in the freezer.

boys ice cream

It wasn’t this warm–they didn’t enjoy their ice cream shirtless, but I love this photo too much not to include it.

Share

Honey Oatmeal Cookies and Easy School Lunches

school lunch

I only cried a little bit.

I dropped my baby off at kindergarten last week. I wasn’t feeling sad until I wrote this column for the Milwaukee Journal Sentinel.

There are a lot of giant kindergartners out there. Mine is small for his age anyway, plus he’s a fresh five. So many parents seem to wait these days until the ripe old age of six to send their babies to school. For many reasons, we chose to send him now (one of which is that he could probably carry on a viable conversation with Nikola Tesla).

So here we are: the school lunch. The only control you have is packing it–the rest is up to your kid. Eat it, stare at it, trade it, throw it away (argh). All you can do is send it.

We’re keeping it pretty simple. None of this (though more power to you if you can swing such artistic endeavors after your kids finally. go. to. sleep.)

My son and I came up with a list of things he would be interested in seeing in his lunch box. Cookies were number one. Soup (?) was a close second. For now, we’re doing some sort of sandwich, wrap or leftovers (see egg muffin above, recipe here). But I have a thermos ready to go when the weather turns cool.

I fill in the gaps with fruits, veggies, cheese, crackers, trail mix and the like. I’m lucky, he’s a good eater. Plus, there’s no morning snack and they’ve typically already had one recess and gym, so he’s one hungry puppy when it’s time to sit down. He’s already complained that he doesn’t have quite enough time to finish (oh if only we were French,) so that’s another bonus for the ‘cold’ lunch–no time wasted standing in line for food. I pack him a water bottle too, so he doesn’t have to stand in line for milk either.

So take heart moms and dads! Talk to your kid and keep lunch simple. Have a rough list of ‘components’ you can draw from each week, or even make a rotating menu plan (I’m not that organized, but I love the idea.)

Mornings are rough, but lunch can be easy. Easier than getting your three-year-old to put on pants.

Below you will find a great lunchbox cookie. Soft, simple and not overly sweet (no refined sugar). The honey keeps them moist–I made them on Sunday and they stayed in great condition all week.

Honey Oatmeal Cookies

3/4 cup unsalted butter (1 1/2 sticks), softened
1 cup honey
1 teaspoon pure vanilla extract
1 large egg
3 cups old fashioned oatmeal
1 1/2 cups all-purpose, unbleached flour
1/2 teaspoon fine salt
1 1/2 teaspoons baking powder
3/4 teaspoon baking soda

Preheat oven to 350 degrees.

Beat butter until it is light and fluffy. Mix in honey, vanilla and egg, beating well after each addition.

In a separate bowl, whisk together oatmeal, flour, salt, baking powder and soda.

Add dry ingredients to butter/honey and mix until just combined.

Drop generous tablespoonfuls on baking sheet. Lightly press down with the heel of your hand. Bake for 10-12 minutes until the edges are lightly golden. Remove from oven and let set up on baking sheet for 3-4 minutes. Move to a cooling rack. Store in an airtight container for up to 6 days.


Share

Strawberry Vanilla Bean Jam

IMG_1412

Our fingers are permanently stained pink. So are our mouths.

Strawberry season is drawing to a close here in southern Wisconsin. What looked to be a fantastic season was hampered by days and days of soaking rains. While farmers were able to pick a fair amount to sell, the season was shortened and the u-pick availability was small. Our neighborhood farm was only open for a single day to pick our own.

I refreshed their web site obsessively for the ‘daily berry update’  and when they opened,  we went. It was my three-year-old’s first trip and my parents accompanied us–three generations picked three flats in about an hour. We reminisced about my grandparents’ love of strawberries–they picked them every year and put quarts up in the freezer in sugar syrup.

Scarlet to the core, big and juicy–nothing beats a ripe local strawberry. We froze several gallon bags, made strawberry shortcake, my favorite quickbread  and finished off the bounty with 11 half-pints of strawberry vanilla jam.

IMG_1441

If you’ve never canned before, summer strawberries are a wonderful place to start. A little more fussy than blueberry jam (you have to hull the berries), but a little simpler than canning tomatoes (no peeling!). And who doesn’t love strawberry jam?

This recipe uses a combination of honey and sugar (and far less than many jam recipes) and the seeds of one vanilla bean. I use Pomona Universal pectin which allows you to use less sweetener than traditional pectin. For this recipe, I used half the recommended pectin. I like my jam soft-set.

jam 2

You can also make this recipe sans pectin, but you will have to cook it awhile longer to get a decent set. It will be delicious, but saucier.

Also if you’ve never canned, I strongly recommend you do a bit of reading on safe canning procedures. I’ll talk you through it here–canning is very simple, but safety is important. Sloppy canning procedures can result in botulism, sickness and other yucky stuff. Keep it clean, folks!

I start by emptying my dishwasher and putting all of my glass jars and rings through the ‘sanitize’ cycle. I also begin heating up my canning water bath and place my lids in a small saucepan on simmer.

Strawberry Vanilla Jam
makes about 11 pints

1 cup sugar
2 teaspoons Pomona Universal pectin
1/2 cup honey
1 vanilla bean, seeds scraped
10 cups hulled, mashed strawberries
4 teaspoons calcium water (comes with the pectin, follow package directions for mixing)

Whisk together sugar and pectin, set aside.

Combine honey, vanilla bean seeds, strawberries and calcium water in a large pot. Bring to a boil over medium-high heat, stirring occasionally. When at a full boil, whisk in sugar-pectin mixture. Whisk enthusiastically for 2 minutes to ensure it is dissolved.

When jam returns to a full boil, skin off any foam and then turn off heat.

Place a hot, sanitized pint jar on a clean dishtowel. If possible, use a wide-mouth funnel to fill jar, leaving 1/2 inch headroom at the top. Remove funnel and wipe rim with a clean paper towel. Place warmed canning lid on top, then screw on ring band until just tightened. Repeat and process all jars in a hot water bath for 10 minutes.

Gently remove from hot water bath and let sit undisturbed overnight. In the morning, check seals by pressing finger in the middle of the can. It should not pop. If any cans haven’t sealed, store them in the refrigerator and eat in a few weeks. All sealed jars may be stored at room temperature for a year.

IMG_1479

Share